Push Messaging Guide
Please ensure you have integrated the Push Module by following the Quick Start Guide.
Below are the steps, you need to complete to enable Push Messaging in your app.
Push Notifications
You can use one of the below two options to handle remote push notifications:
Option 1: Method Swizzling
Option 2: Subclass WebexConnectAppDelegate
Option 1: Method Swizzling
By default, the SDK swizzles the AppDelegate and NotificationCenter methods to handle push token and notification events. If you prefer not to use method swizzling, you can disable it by using the code snippet below. Then, subclass WebexConnectAppDelegate and ensure you call the corresponding super methods. If you use the subclassing WebexConnectAppDelegate to handle the remote notifications, then you cannot use any other SDK which expects you to use the same subclassing process (because Objective-C and Swift don’t support multiple inheritances). So, to support using multiple SDKs (co-existence) you use the Method Swizzling concept which handles the remote notifications.
Sample code for disabling the Method Swizzling
private let push = PushMessagingProvider.instance
push.setAppDelegateMethodSwizzlingEnabled(false)
push.setNotificationCenterMethodSwizzlingEnabled(false)
id<PushMessaging> push = [PushMessagingProvider instance];
[push setAppDelegateMethodSwizzlingEnabled:false];
[push setNotificationCenterMethodSwizzlingEnabled:false];
Option 2: Subclass WebexConnectAppDelegate
The SDK provides the WebexConnectAppDelegate class which contains a lot of the boilerplate code that is required for a working SDK integration. It is highly recommended that you inherit from this class from your own app delegate. If this is not possible, then you may instantiate an instance of the class and chain calls from your app delegate to the WebexConnectAppDelegate.
- Open your AppDelegate class.
- Change your AppDelegate class to inherit from WebexConnectAppDelegate.
class AppDelegate: WebexConnectAppDelegate {
}
@interface AppDelegate : WebexConnectAppDelegate <UIApplicationDelegate>

@end
When using inheritance, ensure that you call through to the super implementation if you override any of the AppDelegate methods. If you do not, the SDK may not function as intended.
If you do not wish to, or cannot, use inheritance:
- Create an instance of WebexConnectAppDelegate within your AppDelegate class.
- Invoke the corresponding WebexConnectAppDelegate methods from your AppDelegate methods as per the following list:
func application(_ application: UIApplication, didFinishLaunchingWithOptions launchOptions: [UIApplication.LaunchOptionsKey : **Any**]? = **nil**) -> Bool
func application(_ application: UIApplication, didRegisterForRemoteNotificationsWithDeviceToken deviceToken: Data)
func application(_ application: UIApplication, didFailToRegisterForRemoteNotificationsWithError error: Error)
func application(_ application: UIApplication, didReceiveRemoteNotification userInfo: [AnyHashable : **Any**], fetchCompletionHandler completionHandler: **@escaping** (UIBackgroundFetchResult) -> Void)
When using call chaining you must do so for all methods listed above. Failure to do so may prevent the SDK from functioning as intended.
Receive Push messages
Incoming Push are received by implementing the PushMessagingDelegate protocol. The delegate also receives changes to the status of the In-App messaging connection
extension AppDelegate: PushMessagingDelegate {
  func pushModuleSetup() {
    private let push = PushMessagingProvider.instance
    push.pushMessagingDelegate = self
  }
  func didReceiveMessage(message: PushMessage, fromTap: Bool) {
    // Push Message received
  }
}
-(void)pushModuleSetup {
id<PushMessaging> push = [PushMessagingProvider instance];
push.pushMessagingDelegate = self;
}
-(void)didReceiveMessageWithMessage:(PushMessage *)message fromTap:(BOOL)fromTap {
// Push Message received
}
Rich Notification Support
This section is only required if you intend to use rich notifications.
Rich notifications allow media, such as large images, to be displayed within the notification center.
Create a Notification Service Extension:
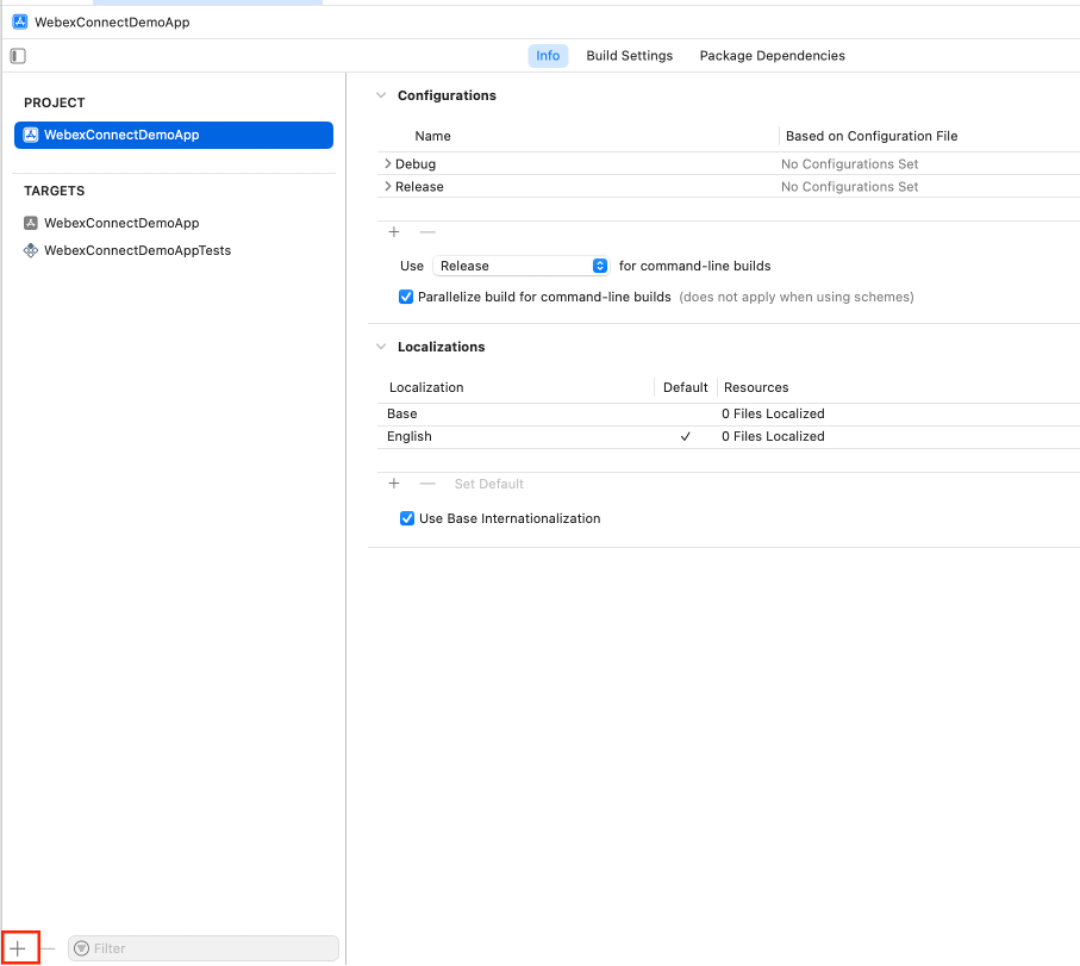
Within App XCode project, click your project within the Project Navigator.
-
Within the Targets section, click the '+' button.

-
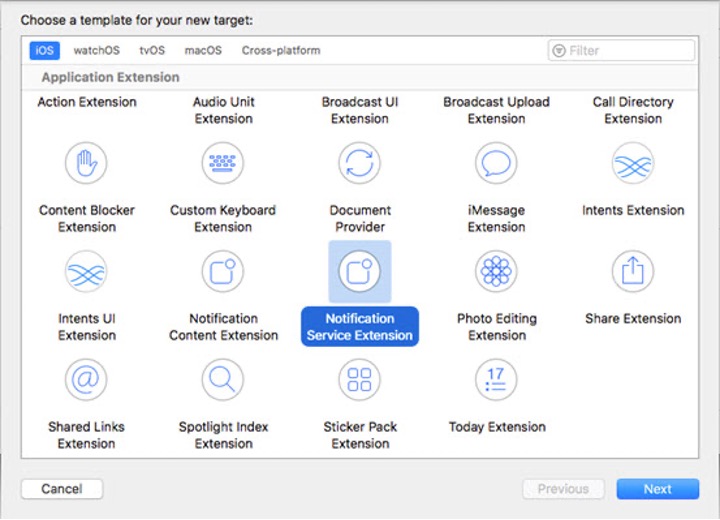
Within the Application Extension section, select Notification Service Extension and click Next.

-
Enter a name and click Finish.
-
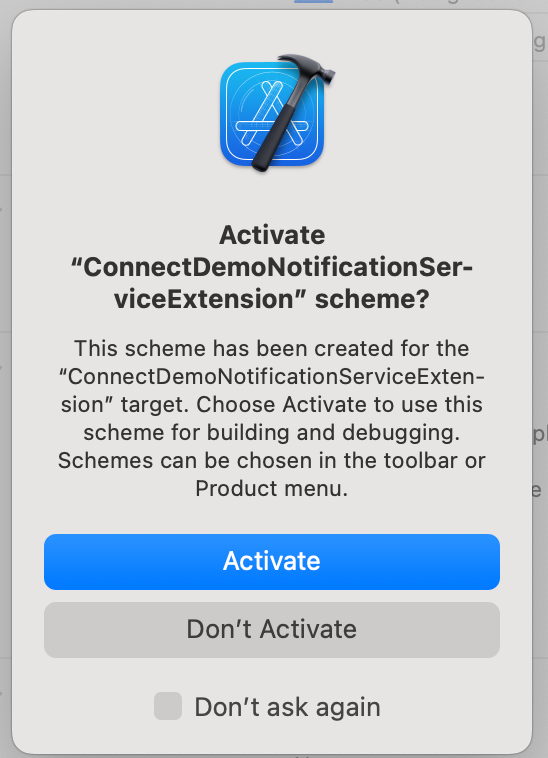
Click Activate.
-
Activate Push Notification Service Extension.

-
You should now see a new folder in your project hierarchy containing three/two new files -
(NotificationService.h, NotificationService.m) / (NotificationService.swift), and Info.plist. -
Follow the Installation steps to integrate the WebexConnectNotificationServiceExtension SDK into
your newly created Notification Service Extension. -
Remove the default code that was generated for NotificationService, leave only the class definition.
-
Change your NotificationService to inherit from
WebexConnectNotificationService
import UserNotifications
import WebexConnectNotificationServiceExtension

class NotificationService: WebexConnectNotificationService {
}
//Within NotificationService.h
#import <UserNotifications/UserNotifications.h>
#import < WebexConnectNotificationServiceExtension / WebexConnectNotificationServiceExtension.h>
@interface NotificationService : WebexConnectNotificationService
@end
//Within NotifcationService.m
#import "NotificationService.h"
@interface NotificationService ()
@end
@implementation NotificationService
@end
With this you have successfully integrated the Push Messaging module in your app.
Updated about 1 month ago
