
iOS SDK Quick Start Guide (Modular)
This document details the changes that are required to the online help portal to support the latest version of the Webex Connect iOS Core SDK with 3.0.0 release quick start Guide changes.
Note
Deprecation of Legacy SDKs
With the release of our new Modular SDKs for Android and iOS, we advise all users to transition to these enhanced SDKs as soon as possible. The Legacy SDKs version 2.x.x will be deprecated on 20th August 2025, after which they will no longer receive support or updates.
To ensure you benefit from the latest features and improvements, please begin the migration process at your earliest convenience. For guidance, refer to our migration documentation or reach out to our support team for assistance.
Prerequisites
| Component | Requirement |
|---|---|
| OS | iOS 13 or higher. |
| Software | Xcode 11.0 and above Webex Connect iOS SDK |
| Accounts | An active Apple developer account. An active Webex Connect tenant. |
OS Version Support
| SDK Version | Min Supported OS | TLS Support |
|---|---|---|
| 3.0.3 and higher | iOS 13 or higher. | iOS provides TLS 1.2 support. The lowest version supported is iOS 13 and versions higher than it. |
SDK Modules
Webex Connect SDK is structured into modular components, each designed to offer specific functionality. Overview of each module and its functionality to help them understand what's available and decide which modules they want to integrate into their applications.
| Module | Description |
|---|---|
| WebexConnectCore | The WebexConnectCore Module is the foundation of Webex Connect SDK. It provides essential functionality that all other modules depend on, including initialization, configuration, registration and shared utilities. Automatically included in the other modules. |
| WebexConnectPush | This WebexConnectPush module enables your application to receive and handle push notifications. It abstracts the underlying push notification service, providing a customization support for notification management. |
| WebexConnectInAppMessaging | The WebexConnectInAppMessaging module offers both one-way and two-way messaging capabilities for your app. |
Configuration Tasks
Complete the following tasks to use Webex Connect Core SDK for your Mobile Application:
Installation
You can install Webex Connect SDKs by using any one of the following methods:
Method 1: Cocoa Pods
Assuming you already have an Xcode project, e.g. MyWebexConnectApp, for your iOS app, here are the steps to integrate the Webex Connect iOS Core SDK into your Xcode project using CocoaPods:
- Install CocoaPods:
gem install cocoapods
- Setup CocoaPods:
pod setup
- Create a new file, Podfile, with following content in your MyWebexConnectApp project directory:
a. Core SDK: WebexConnectCoreSDK source 'https://github.com/CocoaPods/Specs.git'
source 'https://github.com/CocoaPods/Specs.git'
platform :ios, '13.0'
target 'MyWebexConnectApp' do
pod 'WebexConnectCore'
pod 'WebexConnectPush'
pod 'WebexConnectInAppMessaging'
end
target 'MyWebexConnectAppServiceExtension' do
pod 'WebexConnectNotificationServiceExtension'
pod 'WebexConnectPush'
end
b. Notification Service Extension : WebexConnectNotificationServiceExtension
target 'MyWebexConnectAppServiceExtension' do
platform :ios, '13.0'
pod 'WebexConnectNotificationServiceExtension'
end
- Install the Webex Connect iOS Core SDK from your MyWebexConnectApp project directory:
pod install
Method 2: Swift Package Manager
To Integrating the iOS SDK with Swift Package Manager. Please click on the link for detailed steps.
Method 3: Manual Installation
Manual Integration by Downloading Modules from the GitHub Repository. Please click on the link for detailed steps.
Project Setup
-
Enable push notifications:
-
Click your project within the File Navigator.
-
Click Targets > Select Application Target > Signing & Capabilities.
-
Add Push Notifications capability.
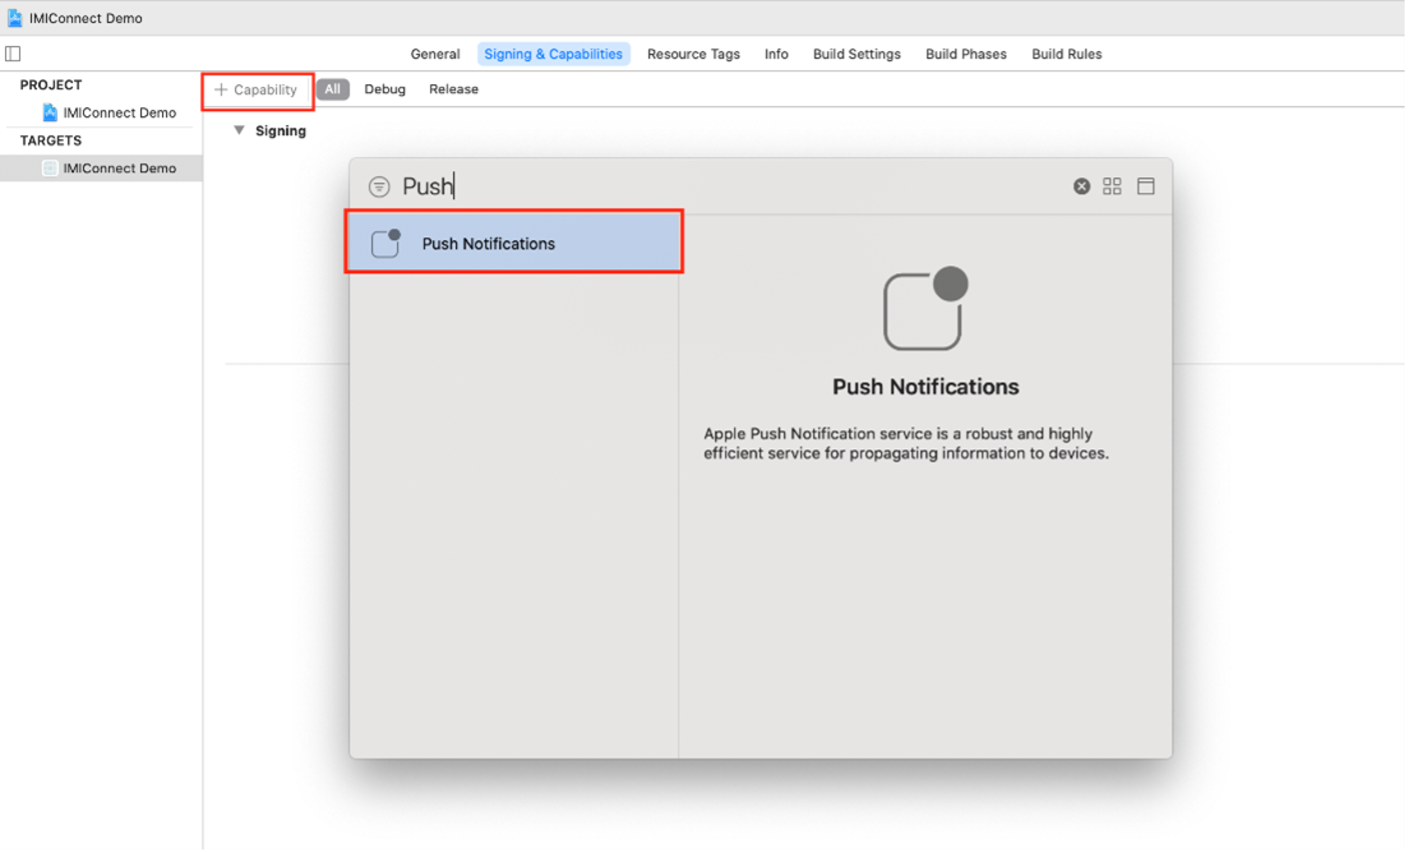
Adding Push notifications
-
-
Add required Background Modes.
-
Click your project within the File Navigator.
-
Click Targets > Select Application Target > Signing & Capabilities.
-
Add Background Modes Capability.
-
Enable Background fetch & Remote notifications.
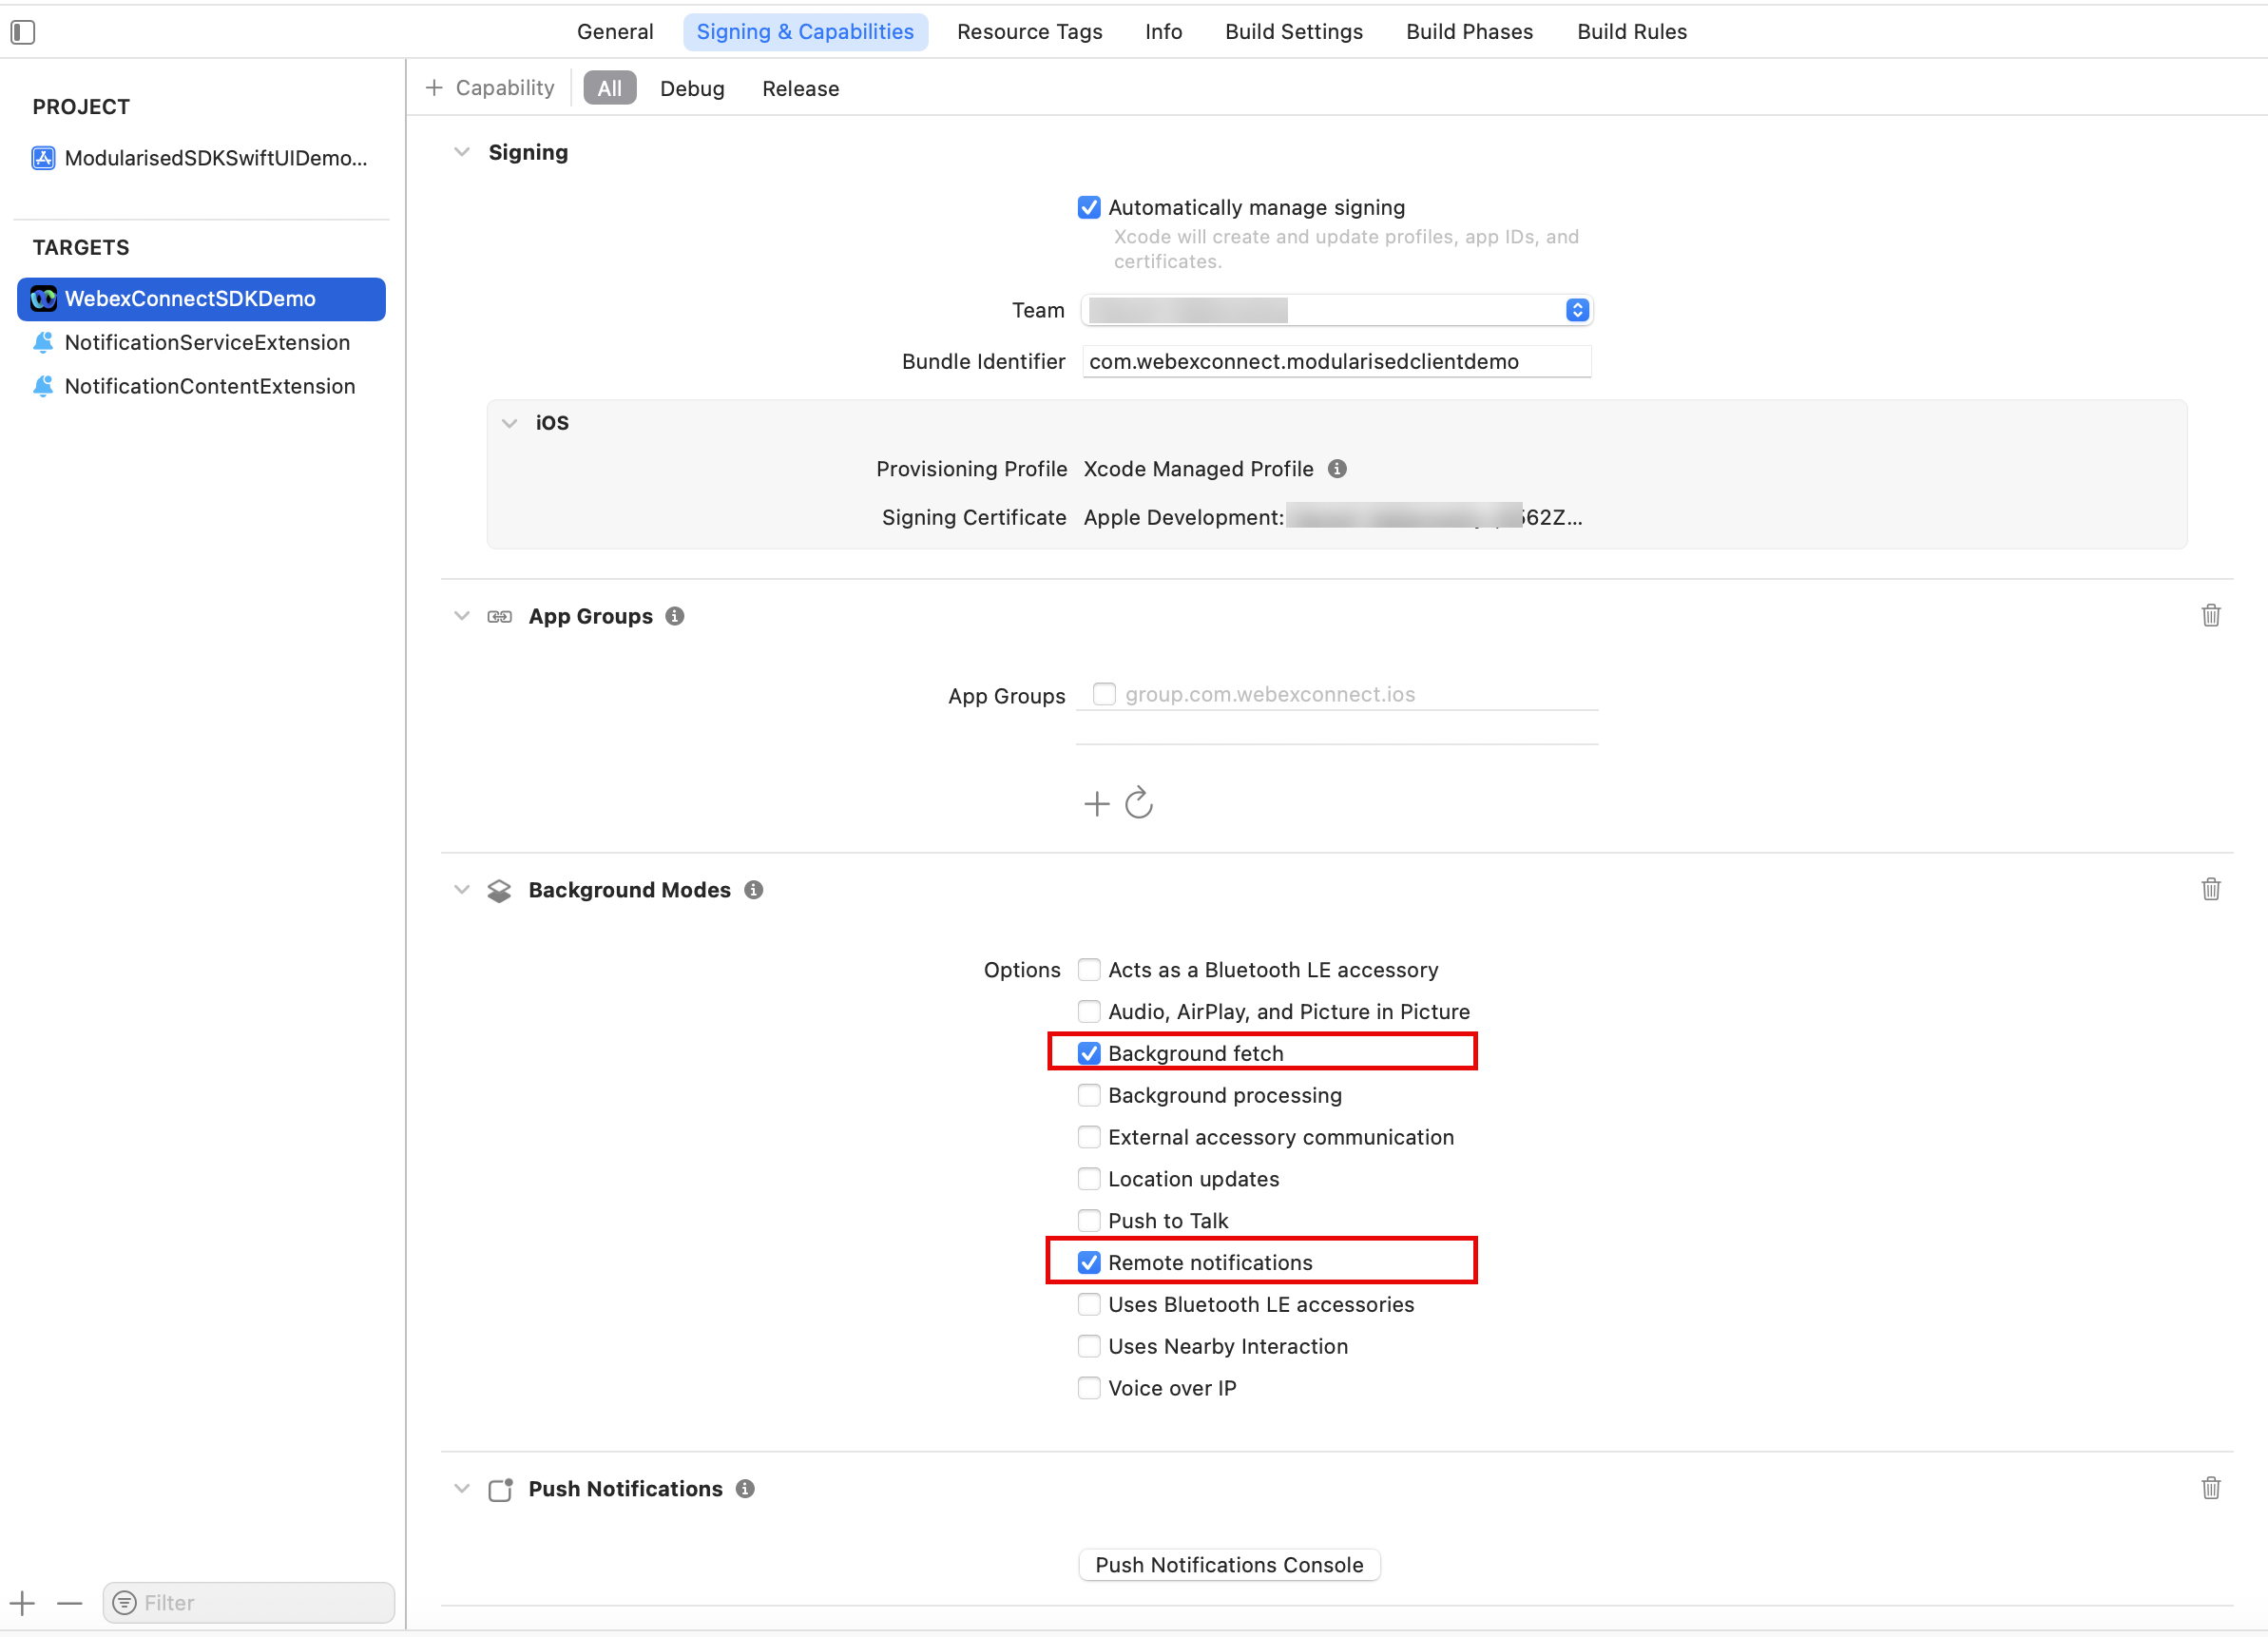
Enabling options for Background Modes
-
Setup APNS
Please follow the link for setting up the APNS.
Configuring iOS .p8 Key for Token-Based Connection to APNs
Please follow the link for setting up the iOS .p8 Key for Token-Based Connection to APNs.
Code Integration
Follow the steps below to integrate the iOS Webex Connect SDK within your application:
Create WebexConnectConfig.plist
Within your Xcode project, create a new plist file named WebexConnectConfig.plist and copy the following snippet into the file. Alternatively, you can download the file from the SDK Configuration Files section available on Webex Connect Mobile & Web asset configuration page.
Note
For tenants with Webex Contact Center (WXCC) or CCE-enabled and assets registered with Webex Contact Center or CCE, JWT Asymmetric authentication is mandatory for Push and In-App Messaging in the Android and iOS SDKs.
When JWT Asymmetric authentication is configured on the Mobile App or Web App Asset page, set
enableAuthTokenExchange=true. At startup, the SDK exchanges the Customer JWT for a short-lived Webex Connect access token and automatically manages token storage, injection, refresh, and retries.For detailed information about JWT Asymmetric authentication, see JWT Asymmetric authentication.
Note
The downloaded file will be named WebexConnectConfig.plist before adding it to your Xcode project. The downloaded file contains mandatory asset information as such the app id, client key and environment details, which is used to authenticate with the Webex Connect platform.
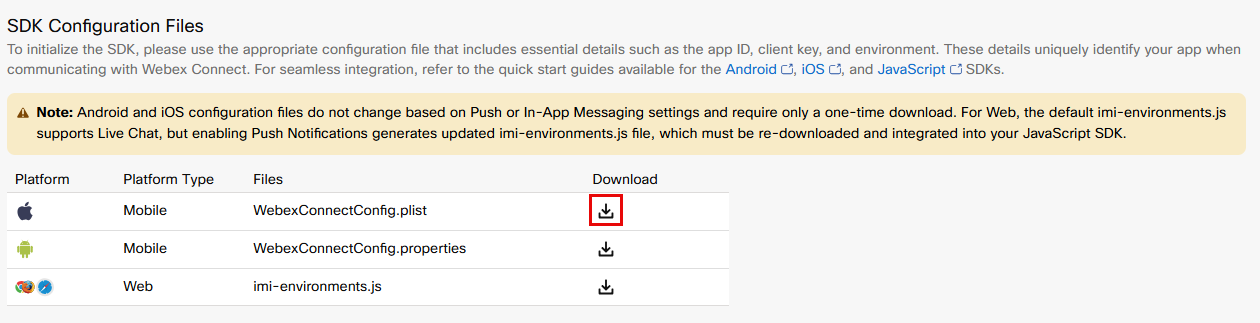
Screenshot to download the WebexConnectConfig.plist file
Note: The Modular SDK reads its configuration from
WebexConnectConfig.plist, added to the main application bundle. The legacyIMIConnectConfig.plistfilename is still recognized for backwards compatibility, but new integrations should useWebexConnectConfig.plist.
Sample Content
WebexConnectConfig.plist
<?xml version="1.0" encoding="UTF-8"?>
<!DOCTYPE plist PUBLIC "-//Apple//DTD PLIST 1.0//EN" "http://www.apple.com/DTDs/PropertyList-1.0.dtd">
<plist version="1.0">
    <dict>
        <!-- MANDATORY The App ID generated by Webex Connect for your application -->
        <key>appId</key>
        <string>Your Application ID</string>

        <!-- MANDATORY The Client Key generated by Webex Connect for your application -->
        <key>clientKey</key>
        <string>Your Client Key</string>

        <!-- OPTIONAL The Webex Connect server environment (e.g. uk, us, ca, in, jp, sg). Defaults to uk when omitted. -->
        <key>environment</key>
        <string></string>

<!-- The following optional properties are not included in the downloaded configuration file. Customers must add them manually when required: -->

        <!-- OPTIONAL Override the zero-rating server domain. Leave empty to use the platform default. -->
        <key>serverDomain</key>
        <string></string>

        <!-- OPTIONAL App-group identifier shared with the Notification Service Extension. -->
        <key>groupIdentifier</key>
        <string>your group identifier</string>

        <!-- OPTIONAL Whether the SDK should request notification permission on registration. -->
        <key>shouldRequestNotificationPermission</key>
        <true/>

<!-- OPTIONAL Enable Customer JWT -> Connect access-token exchange. Defaults to false. -->
<!-- MANDATORY for WXCC- or CCE-enabled assets configured with JWT Asymmetric. -->
<!-- OPTIONAL for standalone assets. -->
        <key>enableAuthTokenExchange</key>
        <false/>
    </dict>
</plist>
Property: enableAuthTokenExchange
enableAuthTokenExchange| Property | Value |
|---|---|
| Key | enableAuthTokenExchange |
| Type | Boolean |
| Default | false |
| Mutability | Read once at SDK startup from WebexConnectConfig.plist. When constructing a Config programmatically, set Config.enableAuthTokenExchange before calling WebexConnect.startup(with:_:); runtime changes after startup do not reconfigure the already-started SDK. |
Behavior
| Setting | Behavior |
|---|---|
<key>enableAuthTokenExchange</key><true/> | The SDK exchanges the Customer JWT for a short-lived Connect access token at startup and then manages access-token caching, injection on each request, proactive refresh (5 minutes before expiry), and automatic retry on token errors. |
<key>enableAuthTokenExchange</key><false/> (default) | The SDK sends the Customer JWT directly in the Authorization header on each request. Legacy authentication behavior is preserved. When the property is omitted, the SDK also encodes the key out of any persisted Config to remain backwards compatible. |
Initialize the SDK
The SDK must be initialized before attempting to use any of its features.
private let webexConnect = WebexConnectProvider.instance
webexConnect.startup { error in
  if error == nil {
    print("SDK started successfully")
  } else {
    print("Error starting up the SDK: \(error)")
  }
}
id<WebexConnect> webexConnect = [WebexConnectProvider instance];
[webexConnect startupWithCompletionHandler:^(NSError* error) {
  if (error == nil) {
    NSLog(@"SDK started");
  } else {
    NSLog(@"Startup failed: %@", error.localizedDescription ?: @"");
  }
}];
Note
The WebexConnect iOS SDK securely stores critical data in the iOS Keychain to ensure proper functionality. Client applications may manage their own Keychain items but should refrain from modifying or deleting entries created by the SDK to prevent any unexpected behavior.
Register a device
The user's device must be registered with the Webex Connect platform before other features can be used. To register a device with the platform, create an DeviceProfile instance and invoke the register method in WebexConnect.
A device profile must always have a unique device id and user id, if you do not supply a user id then the platform will assign one for you. Typically, you will want to supply your own user ID value that corresponds to a user within your backend systems.
The following snippet shows how to create and register a device profile.
private let webexConnect = WebexConnectProvider.instance
var deviceProfile = DeviceProfile(deviceId: DeviceProfile.defaultDeviceId(), userId: "your user id")
webexConnect.register(with: deviceProfile) { response, error in
  if error != nil {
    //Device registration failed, query error for reason information
  } else {
    //Device registered successfully
  }
}
id<WebexConnect> webexConnect = [WebexConnectProvider instance];
DeviceProfile *deviceProfile = [[DeviceProfile alloc] initWithDeviceId:[DeviceProfile defaultDeviceId] userId:@”userID”];
[webexConnect registerWithDeviceProfile:deviceProfile completion:^(id response, NSError *error) {
NSLog(@"Register response: %@, error: %@", response ?: @"nil", error.localizedDescription ?: @"nil);
}];
Note
The SDK automatically unregisters the app user if the app isn't opened for over 40 days. To ensure a seamless user experience, always check if the user is registered by calling isRegistered whenever the app launches, and if not registered, register the user with register. For further details of the profile clean up process, including how profiles are deemed inactive, please see this article.
SDK integration is now complete. To start using Push Messaging, please refer to our Push Messaging Guide and for In-App Messaging, please refer to our In-App Messaging Guide.
Updated 3 months ago